InitialCommit.io Website Architecture Overview
ADVERTISEMENT
Table of Contents
- Introduction
- Choosing the right tools
- General website architecture overview
- Programming languages and IDE in use
- Frameworks and dependencies
- Version control setup, structure, and process
- Deployment process
- Conclusion
Introduction
In this article, we will provide an architecture overview of the initialcommit.io website. Specifically, we will discuss the following topics:
- Choosing the right tools
- General website architecture overview
- Programming languages and IDE in use
- Frameworks and dependencies
- Version control setup, structure, and process
- Deployment process
Choosing the right tools
When I started Initial Commit, my main goal was to share my knowledge of software development and programming, hopefully in a way that would help others learn and improve their lives. I wasn't certain what form the site would take nor how it would evolve over time, and to some extent I am still unsure of this. For this reason, it is very important that the site be fully customizable. Not just in terms of the look and feel, but in terms of the functionality and features that can be implemented. If I think of a great idea for a product or service down the line, I want the ability to implement it the way I see fit, with no restrictions.
This instantly eliminated "website builder" sites, like Squarespace, Wix, etc from contention. These platforms typically advertise speed of website building over quality, offer clunky visual editors, and limited functionality mainly through plugins.
The next option was to create a static site, hosted on GitHub pages or on an Amazon Web Services (AWS) S3 Bucket. This is a great option in terms of cost, low complexity, and ease of maintenance. However, I knew my site would need to perform custom backend processing which wouldn't be possible on a static site, so that was out.
Next, come the standard content management systems (CMS) like Wordpress and Drupal. Although much more flexible than those listed above (and great for blogs), my experience with larger PHP-based CMS has been sloppy at best. It is usually pretty clear from seeing one of these sites that it is built using a CMS. Templates are pretty standard and functionality ends up being strung together using plugins and hooks. Again, functionality is often limited based on available plugins and can be difficult to fully customize. They are just too structured and set in their ways to be viable options for this website.
Moving on, I considered using Node.js, (and even Meteor.js) for the backend with a React frontend. I loved the idea that Meteor.js could dynamically update all clients in real-time without reloading the page. I'm sure this would have been a good option, but I just didn't have enough experience with the newer JavaScript engines at the time. So this was nixed because I just didn't feel confident enough to dive in with my current skillset.
The second-to-last option I considered was using the Python Django framework hosted on the AWS Elastic Container Service (ECS). I had implemeted a web portal in the past using ECS, which could be fully customized using Docker to build and manage the containers. This was great for full customizability, but it was quite complex since I had to manage all of the dependency installations and versions via a Dockerfile, as well as ensure all of the processes on the server were working properly. Overall, this was a good option, but it was too nebulous to be optimal.
Finally, I landed on my winner - the Java Spring Boot framework for the application backend hosted on AWS Elastic Beanstalk. I chose the Thymeleaf templating engine for the HTML templates. The database is MySQL hosted on AWS Relational Database Service (RDS). This setup hit all the nails on the head:
- Spring Boot provides an amazing balance of full customizability while choosing appropriate defaults for settings you don't care about
- Spring Boot leverages a robust set of dependencies for app security and other features
- Any custom functionality (services, integrations, API's) can be implemented through backend Java code and importing Java dependencies
- Dynamic frontend content is easily achievable using the Thymeleaf template engine
- Use Spring Boot profiles to easily define different settings for development and production environments
- AWS Elastic Beanstalk allows easy deployment (and re-deployment) by simply uploading a single Java JAR file containing the application code
- MySQL is a robust and supported backend for Spring Boot and AWS RDS
- Reasonable cost ~$20 per month in AWS costs for webserver and database hosting (as well as DNS management)
- Image hosting on AWS S3 bucket while using AWS CloudFront as a content delivery network (CDN)
I wrote a separate post on how to set up and configure a Spring Boot application on AWS Elastic Beanstalk.
Now let's discuss the architecture of the site in a bit more detail.
General website architecture overview
Here is a diagram illustrating the components of the Initial Commit website:
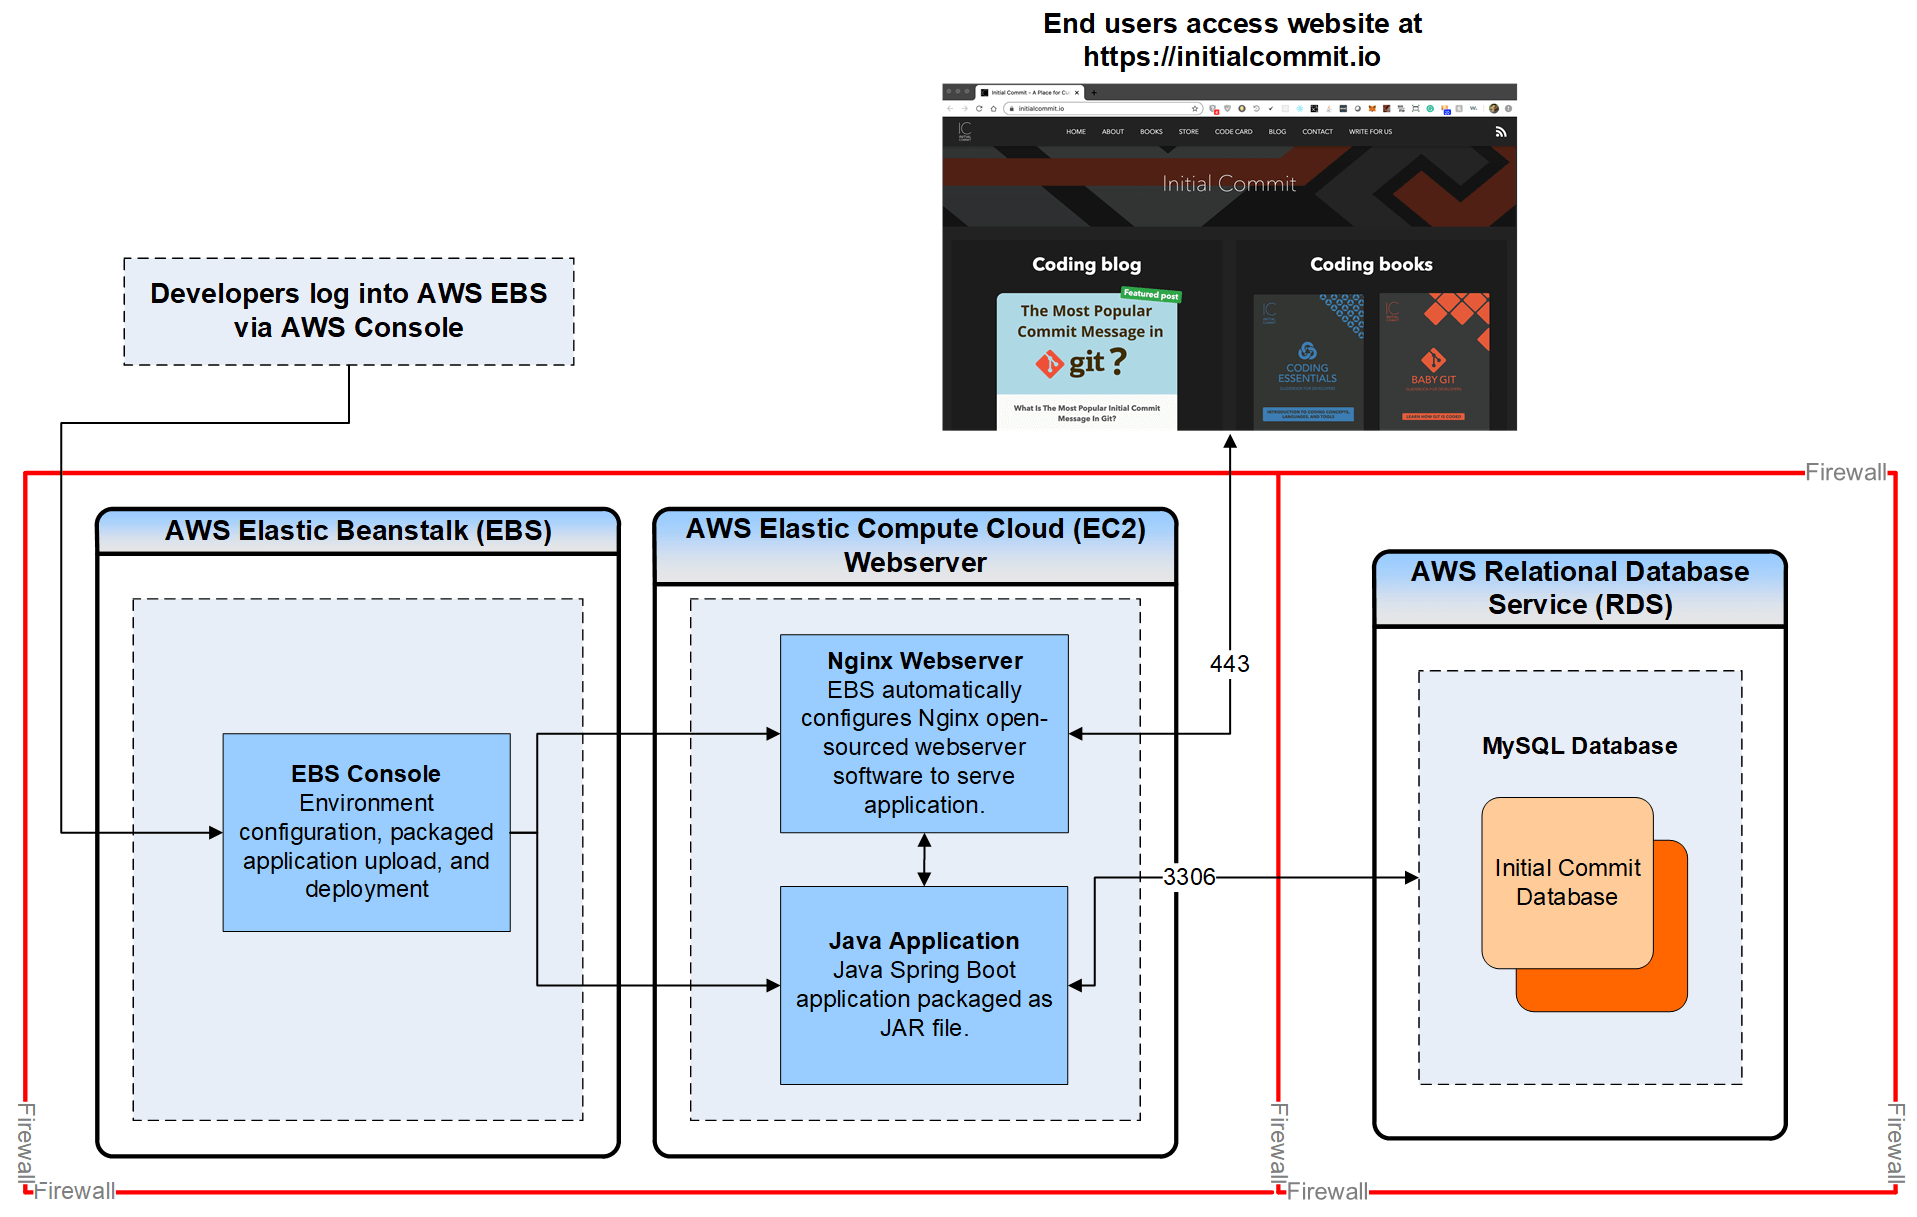
As you can see, the production website is hosted using a variety AWS services. The webserver is managed by AWS Elastic Beanstalk as an Elastic Compute Cloud (EC2) instance. Conveniently, I almost never have to touch the EC2 instance directly. The Elastic Beanstalk service takes care of configuring and spinning up a Linux webserver with a Java environment each time I deploy a new version of the website. There are several configuration options that need to be done manually when setting up the Elastic Beanstalk environment, but after that all future deployments are essentially automated. I can't overstate how convenient this is.
The website's images and fonts are hosted in AWS S3 buckets (not shown in the diagram). This is cost effective and separates the image and font storage from the code itself. This is important because it means that I don't have to redeploy the whole website when I want to add or edit images for parts of the site like the blog. It also reduces the size of the version control repository since images and fonts aren't a part of it. Since AWS doesn't recommend making S3 buckets publicly accessible, I set up the AWS CloudFront content delivery network in front of the S3 buckets. This allows images to be cached on nodes around the world so that they are not constantly being fetched from the S3 buckets, which could rack up large data transfer charges.
Lastly, the DNS for the domain initialcommit.io is provided by AWS Route 53. Handling the DNS through Route 53 allows for smoother integration with several AWS services than using an external DNS provider.
Programming languages and IDE in use
The following programming languages are used to develop the Initial Commit website:
- Java
- SQL
- JavaScript
- HTML
- Thymeleaf template language
- CSS
The website's backend is written entirely in Java. This makes up a majority of the website's code. The backend includes the logic for receiving HTTP requests from the client, parsing the request data, performing business logic, interacting with the MySQL database, sending responses back to the client, and implementing application security. These tasks are implemented using Spring Boot framework, which greatly speeds up application development by leveraging robust libraries.
The tables in the database were created using manually-crafted SQL queries (CREATE TABLE statements). Some examples of database tables are:
- A table containing user ID's, email addresses, and verification settings
- A table containing content and information related to blog posts
- A table containing product information
In addition, the Java code (specifically the repository classes) includes several custom SQL queries in order to fetch specific record sets that are needed for the business logic. One example is retrieving the set of all published blog posts.
Next, we'll move onto the frontend code. Most of the dynamic interactions on the webpages are done with JavaScript and jQuery. This includes things like handling user clicks, user input, form submission, some styling actions and more.
The website's pages are simply written in HTML. The Thymeleaf template language is used to add dynamic content, such as product details and blog post content, from the database to the pages. Thymeleaf is a great choice because it is fully supported by Spring Boot and therefore integrates smoothly.
Finally, static CSS files are used to style the web pages.
For writing and editing code, I choose to use the Spring Tool Suite (STS), which is a version of Eclipse that is tailored to working on Spring projects. I find this to be a convenient tool for working with a large number of code files as well as configuring, starting, stopping, and debugging the application.
Frameworks and dependencies
As mentioned previously, this website is built using the Spring Boot framework. I use Apache Maven as my build tool. Using Maven, dependencies are included in a file called pom.xml. The following dependencies are included:
- spring-boot-starter-parent: Default Spring configuration and application dependency tree
- spring-boot-starter-web: Spring web functionality for mapping HTTP endpoints, handling requests and responses, and more
- spring-boot-starter-thymeleaf: Spring supported Thymeleaf templating engine
- spring-boot-starter-data-jpa: Spring functionality for interacting with databases
- spring-boot-starter-mail: Spring functionality for handling email
- spring-boot-starter-security: Spring security functionalities for authentication, authorization, and more
- spring-security-test: Spring security testing features
- mysql-connector-java: Java connector for MySQL databases
- spring-boot-starter-test: General Spring testing features
- flexmark-all: Convert blog post markdown from database into HTML to be rendered on the page
- rome: Create and configured RSS feed
Version control setup, structure, and process
Unsurprisingly, Git is my Version Control System (VCS) of choice. I use BitBucket to host my Git repository. Since I'm a solo-developer on this project, I keep things simple by working and committing directly on the master branch. Occasionally, I will create separate feature branches for larger updates, but I don't maintain a full development branch at this time. If I start collaborating with others I may add one in the future.
Deployment process
The process for compiling and deploying my website to AWS Elastic Beanstalk is as follows.
-
Compile application locally using Apache Maven with production profile configuration and package it as a JAR file using the command
mvn -Pprod clean install -
Upload JAR file to AWS Elastic Beanstalk
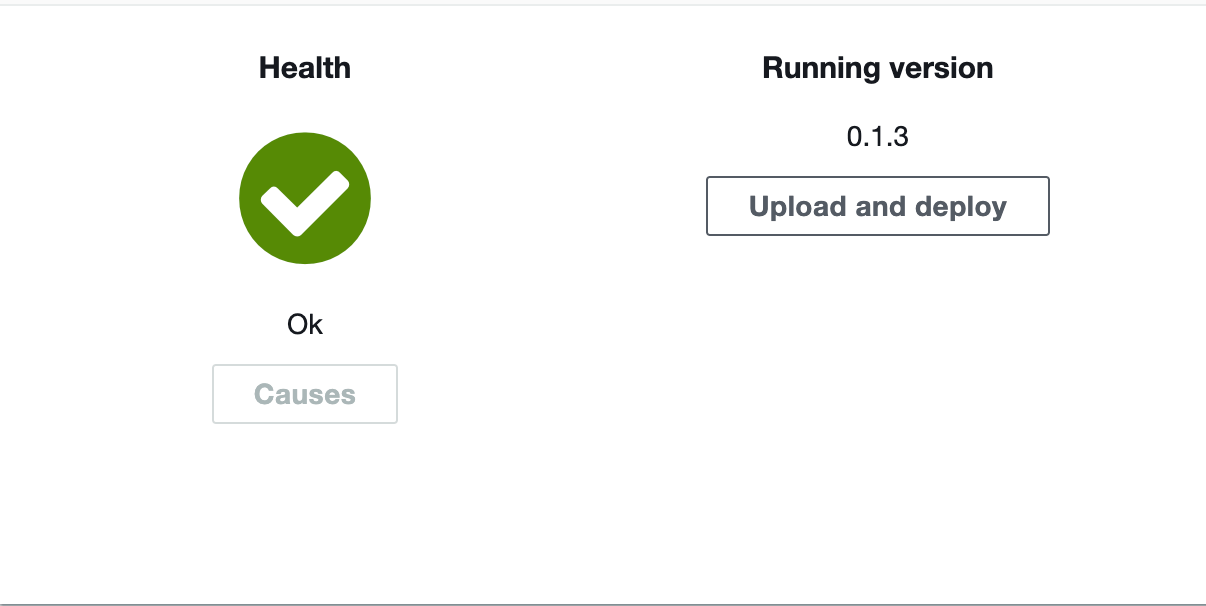
- Enter the version number and click the Deploy button
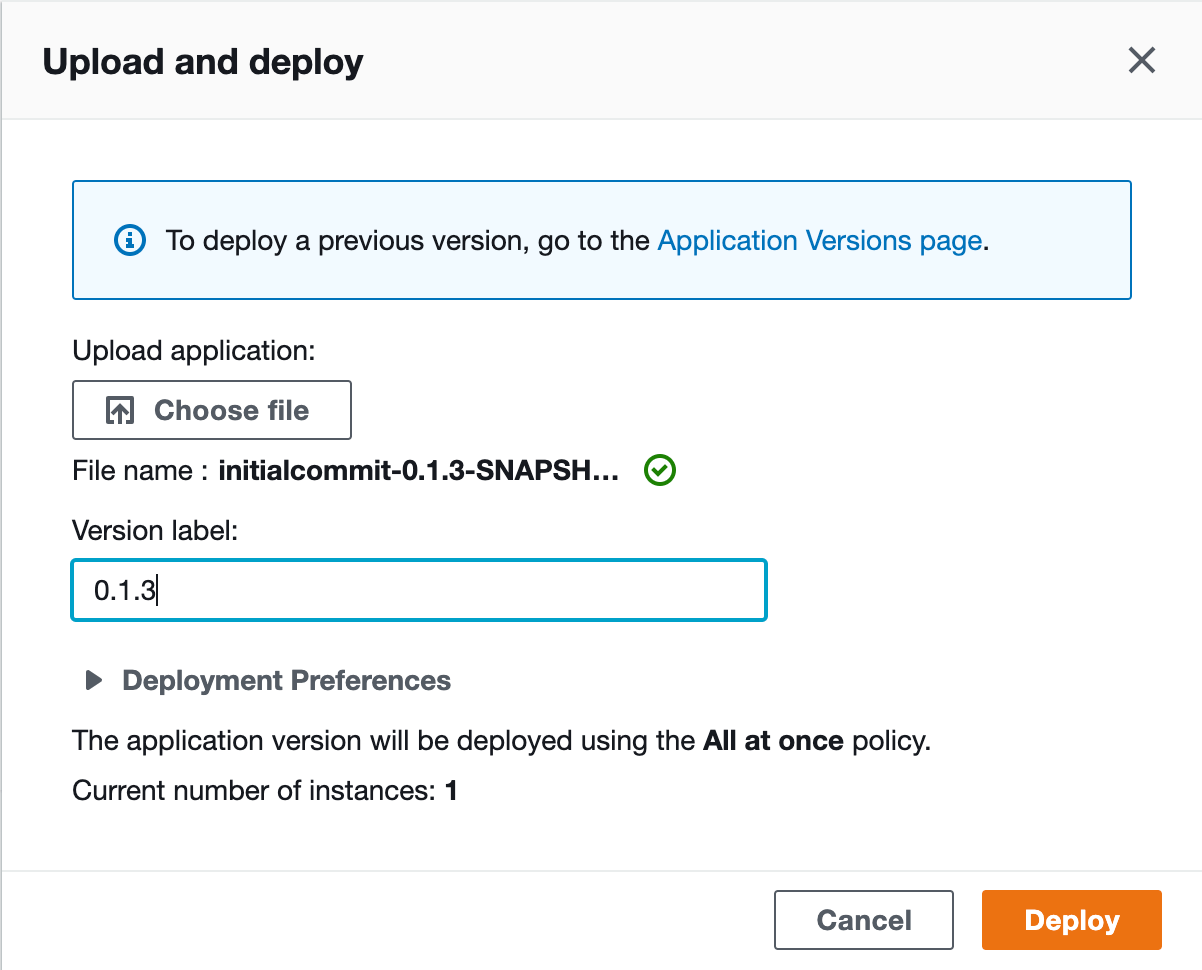
Conclusion
In this article we provided an architectural overview of the initialcommit.io website. I hope learning about the real-world implementation of my website will help you consider your options when deciding to build a site of your own!
Final Notes
Recommended product: Coding Essentials Guidebook for Developers
