Create a Node.js desktop application with Electron, Bootstrap, and Express.js
ADVERTISEMENT
Table of Contents
- Introduction
- Benefits
- We can start by using a template
- Node.js modules required
- Folder structure
- Build out the routes, don't worry there is only one
- Build out the view folder
- Create the Express App.js
- End-to-end solution
- Conclusion
Introduction
Looking to create a Node.js desktop application? You have come to the right place. In this tutorial, we will discover developing Node.js desktop applications with Electron, Bootstrap, and Express.js. This will allow us to create modern, intuitive user-interfaces backed up by powerful backend data systems.
Once you have everything successfully configured and deployed, you may want to look into options for monitoring your application - which is an essential part of the application lifecycle.
Benefits
Create a desktop application that enables easy integration with third-party software from the web. It uses node-package-manager - which is the largest software registry in the world. You can search available integrations on their website here: Node Registry
We can start by using a template
Perform the git clone command to pull down the template to get started:
git clone https://github.com/zero-equals-false/node-desktop-app-template
Install the dependencies:
npm install
Test run the server:
npm start
Your blank canvas:
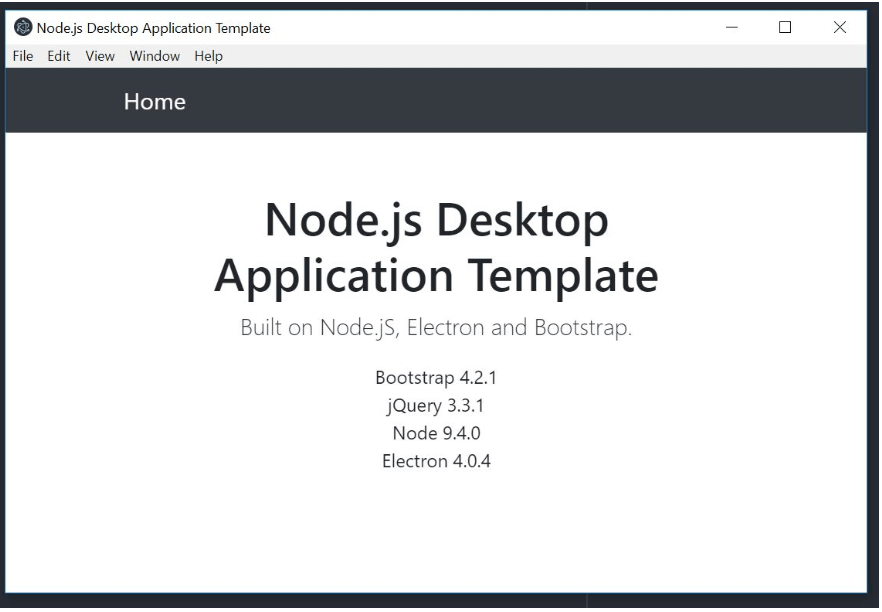
In this tutorial, we will use this template to create a modern full-stack desktop application. We will create a form processing application, which takes user input from a form and injects the data into a word document.
Node.js modules required
To build our form application, we will need Express.js, Docxtemplater, and Pizzip. Express will handle the middleware routing when the form is submitted. Docxtemplater and Pizzip is used for our backend functionality/data injection. Also, to parse and split the data from when it is sent from the front-end to the back-end, we need body-parser. We will serve our form as a .ejs file as a separate view. This will allow us to scale out our views as the application grows larger.
Install dependencies with the following command:
npm install --save express docxtemplater pizzip body-parser
Folder structure
Now let's create our folder structure. It should look like this:
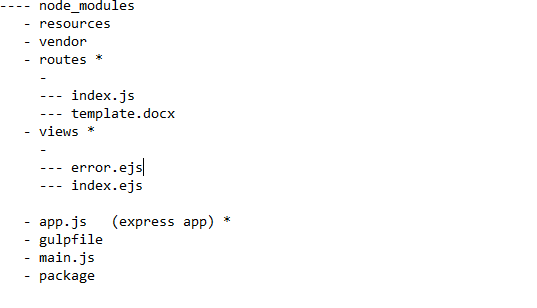
Most folders you should have with the template. I have labeled * against the folders/files we will create. This will be the Express.js app we will be building inside our Electron desktop app.
Let's build our Express app now, by performing the following. Create the directories for routes and views:
mkdir routes
mkdir views
Build out the routes, don't worry there is only one
We will create our route inside our Express app by creating an index.js file inside the routes folder, and adding:
var express = require('express');
var router = express.Router();

var PizZip = require('pizzip');
var Docxtemplater = require('docxtemplater');

var fs = require('fs');
var path = require('path');

// Load the docx file as a binary
var content = fs
    .readFileSync(path.resolve(__dirname, 'template.docx'), 'binary');

var zip = new PizZip(content);

var doc = new Docxtemplater();

async function convertDocument(status, name, surname, postal, suburb, state, phone, mobile, email, postcode, fax, x, y) {

doc.loadZip(zip);

var mr = false;
var mrs = false;
var ms = false;

if(status === "mr") mr = true;

if(status === "mrs") mrs = true;

if(status === "ms") ms = true;

// set the templateVariables
doc.setData({
  hasMr: mr,
  hasMrs: mrs,
  hasMs: ms,
  name: name,
  surname: surname,
  postal: postal,
  suburb: suburb,
  state: state,
  phone: phone,
  mobile: mobile,
  email: email,
  postcode: postcode,
  fax: fax
});

try {
  // renders the document (replacing all occurences of {first_name} by James, {last_name} by Smith, ...)
  doc.render()
}
catch (error) {
  var e = {
      message: error.message,
      name: error.name,
      stack: error.stack,
      properties: error.properties,
  }
  console.log(JSON.stringify({error: e}));
  if (error.properties && error.properties.errors instanceof Array) {
      const errorMessages = error.properties.errors.map(function (error) {
          return error.properties.explanation;
      }).join("\n");
      console.log('errorMessages', errorMessages);
  }
  throw error;
}

var buf = doc.getZip()
           .generate({type: 'nodebuffer'});

// buf is a nodejs buffer, you can either write it to a file or do anything else with it.
fs.writeFileSync(path.resolve(__dirname, '..\\output.docx'), buf);

}

/* GET the home page. */
router.get('/', function(req, res, next) {
  res.render('index', { title: 'Express' });
});

/***
 * Form transformation - inject data into a word document
 */
router.post('/form-submit', function(req, res, next) {

  var status, name, surname, postal, suburb, state, phone, mobile, email, postcode, fax;

  status = req.body.status;
  name = req.body.name;
  surname = req.body.surname;
  postal = req.body.postal;
  suburb = req.body.suburb;
  state = req.body.state;
  phone = req.body.phone;
  mobile = req.body.mobile;
  email = req.body.email;
  postcode = req.body.postcode;
  fax = req.body.fax;

  convertDocument(status, name, surname, postal, suburb, state, phone, mobile, email, postcode, fax);

});

module.exports = router;
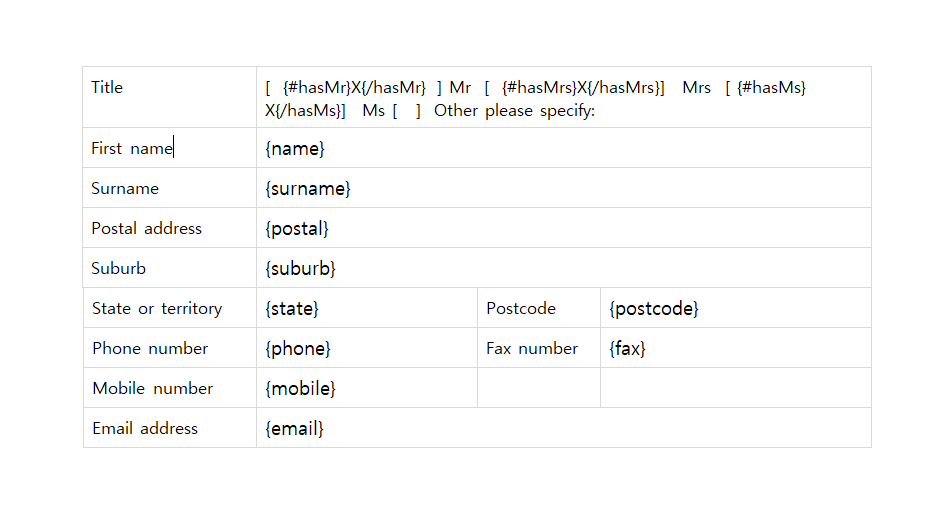
Next, save the word document we will use as a template for the data injection. The word doc must be saved as template.docx inside the routes folder.
Title   [  {#hasMr}X{/hasMr} ] Mr  [  {#hasMrs}X{/hasMrs}]  Mrs  [ {#hasMs}X{/hasMs}]  Ms [   ]  Other please specify:
First name      {name}
Surname {surname}
Postal address  {postal}
Suburb  {suburb}
State or territory      {state} Postcode        {postcode}
Phone number    {phone} Fax number      {fax}
Mobile number   {mobile}
Email address   {email}
The template.docx file will be the file we will use as a baseline to generate each form.
Build out the view folder
Next, we will create our view files inside our view folder. Create the following file, index.ejs and copy and paste the code from below.
<html>
<head>
  <title>Node.js Desktop Application using Electron, Bootstrap and Express.js</title>
  <link rel='stylesheet' href='https://maxcdn.bootstrapcdn.com/bootstrap/3.3.5/css/bootstrap.min.css' />
  <link rel='stylesheet' href='style.css' />
</head>
<body>

  <div class="container">
    <br>
    <br>
    <br>
    <br>
    <div class="form-style-6">

       <h1>Enter client details</h1>
        <form class="border border-light p-5" method="post" action="/form-submit" id="clientform">
          <div class="form-group">

            <br>
            <label>Status</label>
            <select name="status" form="clientform">
              <option value="mr">Mr</option>
              <option value="mrs">Mrs</option>
              <option value="ms">Ms</option>
            </select>

            <label for="nameInput">First name</label>
            <input type="type" class="form-control" id="nameInput" placeholder="First name" name="name">
            <br>
            <label for="surnameInput">Surname</label>
            <input type="type" class="form-control" id="surnameInput" placeholder="Surname" name="surname">
            <br>
            <label for="nameInput">Postal address</label>
            <input type="type" class="form-control" id="postalInput" placeholder="Postal address" name="postal">
            <br>
            <label for="suburbInput">Suburb</label>
            <input type="type" class="form-control" id="nameInput" placeholder="Suburb" name="suburb">
            <br>
            <label for="stateInput">State</label>
            <input type="type" class="form-control" id="stateInput" placeholder="State" name="state">
            <br>
            <label for="phoneInput">Phone</label>
            <input type="type" class="form-control" id="phoneInput" placeholder="Phone" name="phone">
            <br>
            <label for="mobileInput">Mobile</label>
            <input type="type" class="form-control" id="mobileInput" placeholder="Mobile" name="mobile">
            <br>
            <label for="emailInput">Email</label>
            <input type="type" class="form-control" id="emailInput" placeholder="Email" name="email">
            <br>
            <label for="postcodeInput">Postcode</label>
            <input type="type" class="form-control" id="postcodeInput" placeholder="Postcode" name="postcode">
            <br>
            <label for="faxInput">Fax</label>
            <input type="type" class="form-control" id="faxInput" placeholder="Fax" name="fax">
            <br>
          </div>

          <button type="submit" class="btn btn-primary" id="send" onclick="alert('thank you!')">Submit</button>

        </form>

        <br>
        <br>

    </div>
  </div>

  <script src="https://maxcdn.bootstrapcdn.com/bootstrap/3.3.5/js/bootstrap.min.js"></script>
</body>
</html>
Let's also create an error file incase anything goes wrong, create the error.ejs file:
<h1><%= message %></h1>
<h1><%= error.status %></h1>
<pre><%= error.stack %></pre>
Create the Express App.js
Now let's finish off our Express.js application, create the app.js file in the top level of the project.
app.js
var express = require('express');
var path = require('path');
var bodyParser = require('body-parser');
var index = require('./routes/index');

var app = express();

// view engine setup
app.set('views', path.join(__dirname, 'views'));
app.set('view engine', 'ejs');


app.use(bodyParser.json());
app.use(bodyParser.urlencoded({ extended: false }));
app.use(express.static(path.join(__dirname, 'public')));

app.use('/', index);

// catch 404 and forward to error handler
app.use(function(req, res, next) {
  var err = new Error('Not Found');
  err.status = 404;
  next(err);
});

// error handlers

// development error handler
// will print stacktrace
if (app.get('env') === 'development') {
  app.use(function(err, req, res, next) {
    res.status(err.status || 500);
    res.render('error', {
      message: err.message,
      error: err
    });
  });
}

// production error handler
// no stacktraces leaked to user
app.use(function(err, req, res, next) {
  res.status(err.status || 500);
  res.render('error', {
    message: err.message,
    error: {}
  });
});

const server = app.listen(3000, () => console.log(`Express server listening on port 3000`));


module.exports = app;


<div id='waldo-tag-14053'></div>

## Modify the main.js file to include Express.js

I have copied the code for convenience, however it is only two lines which need to be added. These are displayed in caps, as :

** // ADD THIS**.

```javascript
const {app, BrowserWindow} = require('electron')

const server = require('./app'); //ADD THIS

let mainWindow;

function createWindow () {

  mainWindow = new BrowserWindow({
    width: 800,
    height: 600,
    webPreferences: {
      nodeIntegration: true
    }
  })

  mainWindow.loadURL('http://localhost:3000')  //ADD THIS
  mainWindow.on('closed', function () {
    mainWindow = null
  })
}

app.on('ready', createWindow)

app.on('resize', function(e,x,y){
  mainWindow.setSize(x, y);
});

app.on('window-all-closed', function () {
  if (process.platform !== 'darwin') {
    app.quit()
  }
})

app.on('activate', function () {
  if (mainWindow === null) {
    createWindow()
  }
})
End-to-end solution
Ok, well done! you have made it this far. You have successfully built a modern Node.js express application using Electron, Bootstrap and Express.js. Last but not least, start your desktop application by using npm start:
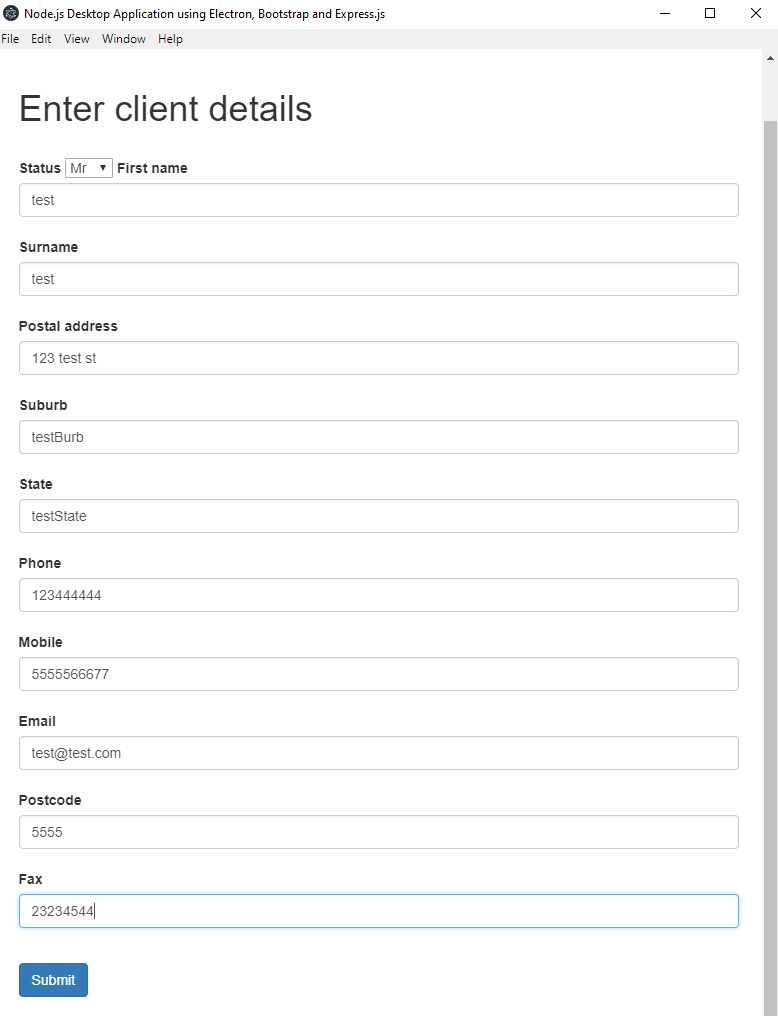
Now in your project folder, you should see an output.docx:
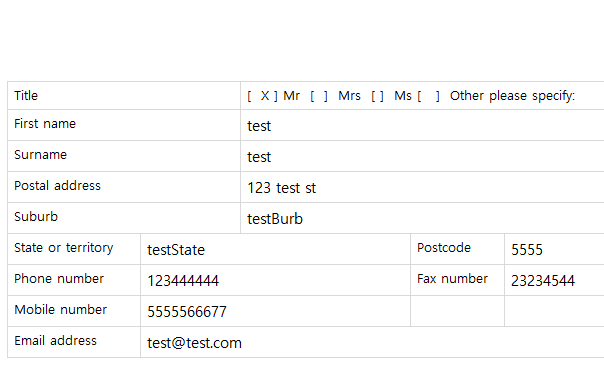
You can view the full source code for this tutorial here
Conclusion
This is a Node.js desktop solution for both front-end and back-end, taking data from a form on the front-end and mapping it to specific locations in a word document (data processing). However, this is only one use-case, there are many other uses for Node.js desktop applications out there.
Final Notes
Recommended product: Coding Essentials Guidebook for Developers
