Git cheat sheet: 12 essential Git commands for beginners

ADVERTISEMENT
Table of Contents
- Introduction
- 1) git init
- 2) git clone
- 3) git status
- 4) git add
- 5) git commit
- 6) git branch
- 7) git checkout
- 8) git merge
- 9) git push
- 10) git pull
- 11) git log
- 12) git stash
- Summary
- Next Steps
Introduction
Git is the most popular version control system (VCS) in the world and it's hard to imagine what a developer's life would be like without it. Nowadays, the vast majority of developers - including individuals and large companies - choose Git for their projects.
The very first question that comes to a beginner is - How to use Git?
In this article, I will explain 12 essential Git commands that are especially important for beginners. To make your life easy, you can use this post as a Git Cheat Sheet for reference in the future.
Now let’s dive in.
1) git init
This is probably the first command you will use when creating a new project. It is used to initialize a new, empty, Git repository. The syntax to use this command is really simple:
git init
Here is a short animation we created to help you visualize how to use git init:
2) git clone
Oftentimes, you already have an existing Git repository (sometimes hosted on a site like GitHub or Bitbucket) and you want to copy it to your local machine. In this case, the git clone command is what you'll need. In simple terms, this command is used to create a copy or clone of an existing repository:
git clone [url-to-existing-git-repo]
3) git status
Git is always watching for changes in the working directory of your project. This includes changes like creating a new file, adding a file for tracking, deleting a file, changing file permissions, modifying a file name or content, etc. You can list the changes that Git sees at a particular time by using the git status command:
git status
4) git add
Once you make some changes to a file in your working directory and confirm they are correct with the git status command, it's time to add those changes to Git's staging area.
You can use the git add command to add a single file to the staging area at a time:
git add <your-file-name>
Or, if you have more than one changed file, you can add them all with the -A option:
git add -A
Alternatively, you can use a single dot instead of the -A option:
git add .
5) git commit
Once your changes are staged, you can use the git commit command to save those changes into the Git repository. A Git commit is a set of file changes that are stored in Git as one unit.
As a part of the this process, you should provide a clear and concise commit message, so other developers can easily understand its purpose:
git commit -m "some useful comment about your change"
A popular rule of thumb is to write commit messages in the imperative mood.
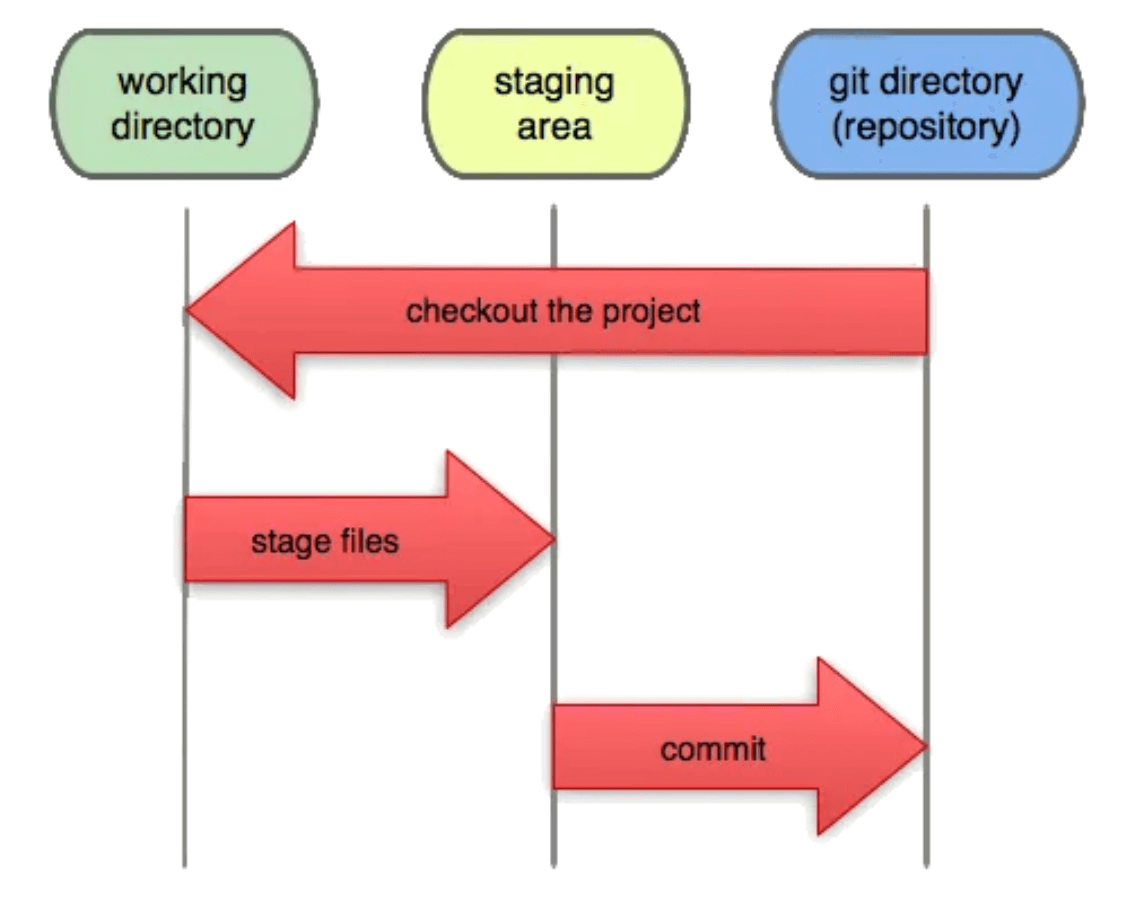
Here is an image to help you visualize how changes flow from Git's working directory, to the staging area, and are finally committed to the repository:
Figure 1: Git Working Direction, Staging Area, and Repository

6) git branch
You can think of a Git branch as a chain of commits or a line of development. In reality, a branch name is just a label that points to a specific commit ID. Each commit ID links back to it's parent commit ID which forms a chain of development history.
The git branch command is like a swiss-army knife. It will show all Git branches in the current Git repository. The branch marked with an asterisk is your current branch:
git branch
To create a new branch, simply use the above command and specify your new branch name:
git branch <new-branch-name>
7) git checkout
The git checkout command allows you to jump (switch) between different branches by updating your working directory to reflect the tip of the checked-out branch:
git checkout <name-of-branch>
In addition, the git checkout command can be used to create a new branch and check it out at the same time:
git checkout -b <name-of-branch>
8) git merge
So, now you have completed your work by making several commits on your new branch. What next?
Usually, these changes should be merged back into the main code branch, (usually called master by default). We do this using the git merge command.
git merge <branch-to-merge-from>
Note that the git merge command merges commits from the specified branch into the currently checked-out branch. So before running the command, you need to check-out the branch that you want to merge into.
9) git push
So far, all of the commands we've run have only affected the local environment. Now it's time to share your newly committed changes with other developers by using git push to send them to the remote repository (often hosted on sites like GitHub and Bitbucket):
git push <remote> <name-of-branch>
As an example, this will often look something like:
git push origin master
In this case, we are pushing the master branch to the remote repository labelled origin (which is the default name for a remote in Git).
Once you push your changes, other team members can see them, review them, and pull them into their own local copies of the Git repository.
10) git pull
The git pull command is just the opposite of git push. You can use it to download changes made by other developers into your local repository:
git pull <remote> <name-of-branch>
The above command will download new commits in the specified branch of the remote repository and try to merge them into your local copy of that branch. The actual command will look like the following example using the origin remote and master branch:
git pull origin master
A fun fact is that the git pull command is really just a combination of the git fetch command, which downloads a remote branch to the local repository, and the git merge command, which merges the downloaded branch into the local copy.
11) git log
If you want to view the history of all commits on a Git branch, git log is the solution. The git log command displays an ordered list of all the commits, along with their authors, dates, and commit messages, from newest to oldest:
git log
To list commits from oldest to newest, use the --reverse option:
git log --reverse
If you are a visual person, you may want to try out the following command option which will display a graphical representation of the commit history in your terminal:
git log --all --graph --decorate
This can be useful for seeing how branches diverge and merge back together in the development process.
12) git stash
Sometimes, you make some changes to files in your working directory, but then realize you need to work on something else. However, you don't want to lose the work you did so far. In the situation, the git stash command can be used to save all uncommitted changes in the working directory so we can retrieve them later:
git stash
After using git stash, your working copy will be cleaned (all your changes will disappear). But don't worry they aren't lost, git stash simply places those changes in temporary storage which you can retrieve using the git stash pop command:
git stash pop
Here the pop subcommand will reapply the last saved state in the stash so you can continue working where you left off.
Summary
In this article, I discussed 12 essential Git commands for beginners, which you can use as a reference - your Git cheat sheet.
Next Steps
If you're interested in learning more about the basics of Git, coding, and software development, check out our Coding Essentials Guidebook for Developers, where we cover the essential languages, concepts, and tools that you'll need to become a professional developer.
If you want to learn about Git in more depth, check out our top Git books.
We hope you enjoyed this post! Feel free to shoot me an email at jacob@initialcommit.io with any questions or comments.
Final Notes
Recommended product: Decoding Git Guidebook for Developers


