AWS EMR - A Gentle Introduction to AWS Elastic MapReduce

ADVERTISEMENT
Table of Contents
- Introduction
- What is AWS EMR
- Prerequisites
- AWS Management Console
- Setting Up Storage
- Create The S3 Bucket
- PySpark Script
- Setting Up The Cluster
- Cluster Status
- Retrieving The Results
- Terminating The Cluster
- Summary
- Next Steps
Introduction
You have vast amounts of data to sift through, and your team has analyzed the problem and determined a big data solution is the best fit for the job. With so many options available in terms of Cloud solution providers and their assortments of big data tools all requiring selection, set up, and configuration, the work ahead can seem daunting. Not to worry, AWS EMR has you covered.
In this article, we'll explore the AWS EMR (Elastic MapReduce) tool set and set up your first big data workload. Within, we'll set up storage, compute nodes, transfer the dataset to the system, monitor progress, and collect and review the results.
What is AWS EMR
AWS EMR is a web hosted seamless integration of many industry standard big data tools such as Hadoop, Spark, and Hive. The pages of AWS EMR provide clear, easy to comprehend forms that guide you through setup and configuration with plenty of links to clear explanations for each setting and component. Helpful Learn more links are pervasive throughout the framework.
Much of the minutiae involved in setting up the components is taken care of automatically, while all the options you need are presented.
Our journey will start from the EMR Management Console, from which we can jump to each of the related pages for the components we choose to incorporate in the solution.
EMR, which is very similar to Hadoop, is an ecosystem of different components working together to provide different ways of storing and processing big data in a stack-like structure. At different levels in the stack, these components are interchangeable enabling different configurations of components to be set up to handle the specific requirements of any particular task. MapReduce sits near the top of the stack providing data transformation and aggregation; below it reside services that negotiate resources, then below that are storage services.
Apache Spark is one of these components that operates at the same level of the stack as MapReduce. In contrast to MapReduce which is suited more for batch processing of jobs that aren't expected to complete quickly, Spark is very fast and operates mostly in memory and can handle real-time streaming of data as it efficiently distributes the processing across the cluster. We'll be using Apache Spark in this tutorial, calling its API from Python.
Apache Hive sits on the layer on top of MapReduce and provides an SQL-like interface to the data. Although Hadoop is not a database, Hive makes it appear as if it is and database tools can even connect to it as if it were. This tutorial won't be using Hive, but like Hive, Apache Spark provides SQL-like queries to our data.
Prerequisites
For this tutorial, you will need an AWS account. Some readers may already have their accounts and can skip to AWS Management Console section below to begin the tutorial. It's relatively easy to create an AWS Free Tier account which gives access to many AWS services free of charge.
A caveat is in order here: the EMR cluster we will create does incur some small charges even though it shows up on the Management Console from Free Tier accounts. However, if you stick to the tutorial and terminate your cluster before you end off, the charges should be under $1 USD. If you need to take a break while you have the cluster running, just terminate it and recreate when you return.
Setting up your account is easy, just head over to AWS Free Tier, then return to the tutorial when you're ready to begin.
AWS Management Console
The Management Console is our first stop of the tour. If you aren't already on that page, you can access it here. From this page we stand at the crossroads of a plethora of AWS services. First we'll set up our storage, then return here and set up our cluster.
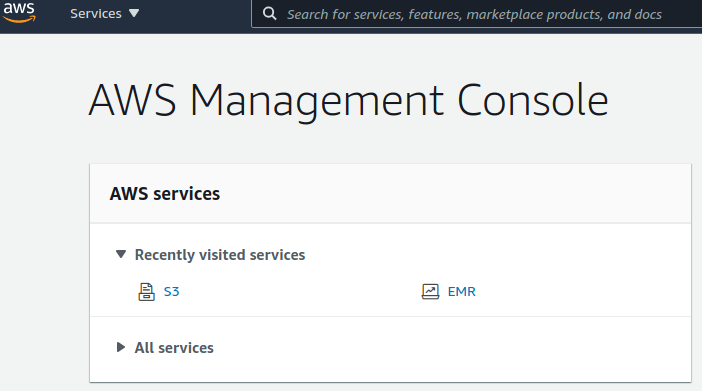
The AWS services are listed under All services and include everything from data analytics to machine learning. In the upper right, the region can be selected. Select a region close to you. This setting is global and persistent. We'll want the storage and cluster to be in the same region for best performance.
Setting Up Storage
Follow: Management Console > All Services > S3 > Create bucket
S3 stands for Simple Storage Service. It provides storage accessible through an easy to use web service interface.
Create The S3 Bucket
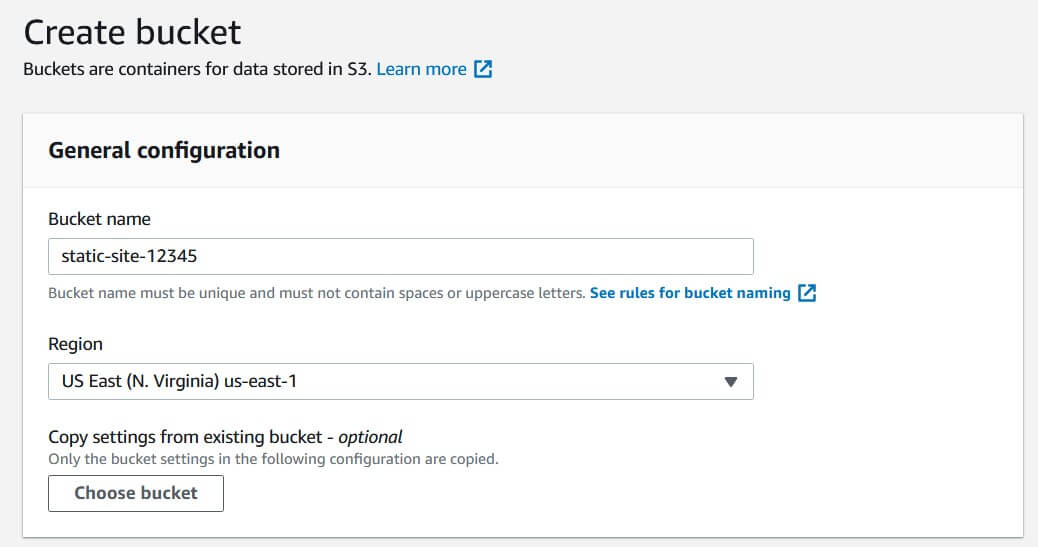
In the Bucket name field, think of a good name for the bucket; something like "intro-emr-...". The name will have to be globally unique across all accounts, so customize the name however you like.
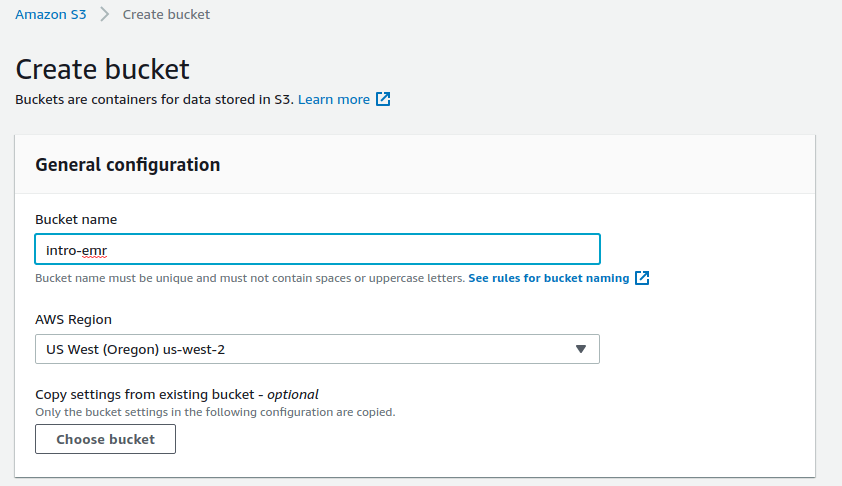
Keep all remaining options at their default settings. Scroll down to the bottom of the page and click the Create bucket button - if any of the options on the way down catch your eye, you can click their Learn more link to open a new tab and read about it now or come back to it later.
Create The Folders
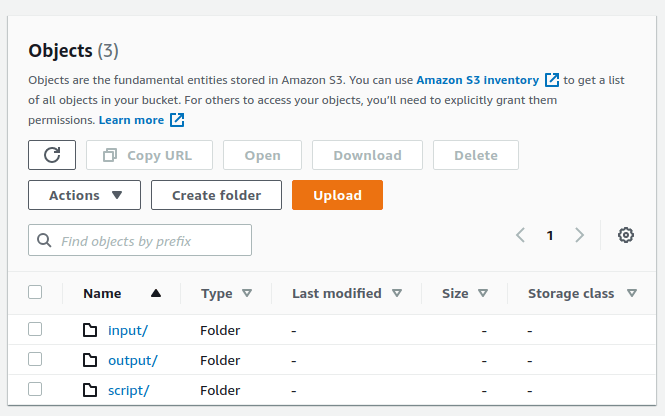
Now that our bucket is ready, we can populate it with folders, which we'll name:
- input - holds our input data we're going to process.
- output - where logs and the processing output will go.
- script - home to our PySpark script.
Click the name of the bucket to get to the Objects form. Then click Create folder to create the input folder. Repeat this process two more times to create the output and script folders.
Upload Script and Data
Now that all our folders have been created, we're ready to upload our data and PySpark script. Create a local file named vaccinations_per_mil.py and copy the content under the PySpark Script section below to it.
Click the script/ folder link on the Objects form to get the upload form.
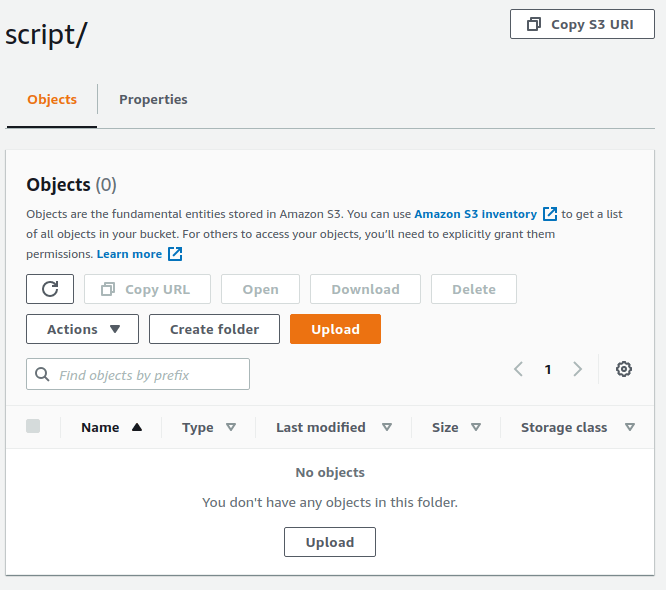
Click the Upload button to bring up the file dialog and navigate to the script and upload it.
Follow the same steps for the dataset, owid-covid-data.csv, which can be downloaded from the owid/covid-19-data Github repository. You'll see the file listed with others in the files table at the top of the page. Or you can try downloading from this direct link.
Our World in Data provides many excellent resources for COVID-19 data and processing, among many other projects.
PySpark Script
This is the PySpark script we'll be uploading to the script/ folder of the S3 bucket. Create a local Python file and copy the content below to it. Then jump back to the Upload Script and Data section for the next step.
#!/usr/bin/env python
# coding: utf-8

# vaccinations_per_mil.py
#
# Processes the owid-covid-data.csv file using PySpark SQL and produces a
# new CSV file listing the top 10 locations with the highest sums of
# vaccinations per million of the population. The script simply sums the
# number of reported new vaccinations (smoothed) for each date by location.
#
# The script requires two command line arguments passed to it. Each should
# map to their appropriate folder in the S3 bucket that was created while
# following the tutorial.
#
# Arguments:
#   <input URI>  - The URI path to the input file (owid-covid-data.csv).
#                  e.g.: s3://<bucket-name>/input/owid-covid-data.csv
#   <output URI> - The URI path to the output folder.
#                  e.g.: s3://<bucket-name>/output
#

from pyspark.sql import SparkSession
import sys

def process_data(inp_uri, outp_uri):
    with SparkSession.builder\
                     .appName('Vaccinations Per Million By Location')\
                     .getOrCreate() as spark:

        covid19_df = spark.read.option('header', 'true').csv(inp_uri)

        covid19_df.createOrReplaceTempView('covid19_data')

        vacc_query_result = spark.sql(
            """SELECT   location,
                        SUM(new_vaccinations_smoothed_per_million)
                        AS vaccinations_per_mil
               FROM     covid19_data
               WHERE    new_vaccinations_smoothed_per_million <> ''
               GROUP BY location
               ORDER BY vaccinations_per_mil DESC LIMIT 10
            """)

        vacc_query_result.write.option('header', 'true')\
                               .mode('overwrite')\
                               .csv(outp_uri)

if __name__ == '__main__':
    if len(sys.argv) == 3:
        input_uri  = sys.argv[1]
        output_uri = sys.argv[2]
        process_data(input_uri, output_uri)
    else:
        sys.exit(f"USAGE: {sys.argv[0]} <input> <output>\n\n"
                  "  Positional Arguments:\n"
                  "    input  - The URI of the input CSV file.\n"
                  "    output - The URI of the output folder.\n")
The Versatility of S3
I'd like to take a momentary pause from the tutorial to mention some additional resources you may find of interest regarding the highly versatile storage solution, AWS S3. Not only can it act as a repository for large files awaiting big data processing, it finds application in such things as hosting static content for your websites. You can find another great article on Using AWS CloudFront As A CDN For An S3 Static Site here on the Initial Commit blog.
And if you'd like to continue learning more about hosting static content and continuous deployment via AWS services, here's another great article for you to read: Continuous Deployment Of AWS S3 Static Site.
Setting Up The Cluster
Follow: Management Console > All Services > Analytics > EMR
Now that our inputs are set up, we can start setting up the cluster. Click the Create cluster link to bring up the cluster creation form.
Give the cluster a name like "intro-emr-cluster", or one of your choosing. Unlike the S3 bucket, the name of the cluster doesn't have to be globally unique.
Under Logging in the S3 folder field, we want to put the path of the S3 bucket we created and append to that a new folder name called "log". It should look something like: s3://YOUR-S3-BUCKET/log/
Under Applications, select the bundle that includes Spark as shown below.
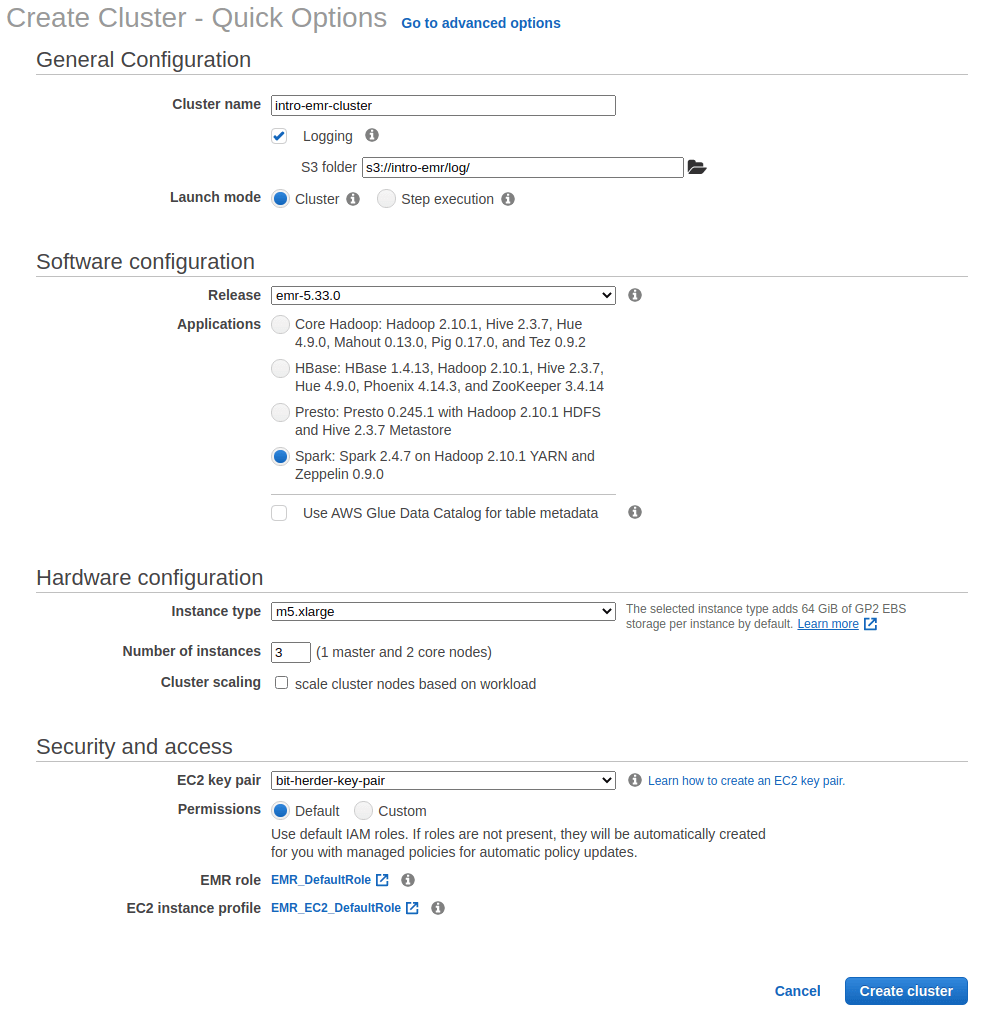
Note under Number of instances, by default we'll be setting up 3 nodes (1 master and 2 core nodes). At runtime the master node will distribute the workload to the core nodes which handle the processing of the dataset.
Keep the rest of the options at their default settings and press the Create cluster button to create the cluster.
Cluster Status
After Create cluster has been pressed in the previous step, the status of the cluster should slowly progress from Starting, then Running, and finally Waiting. When the cluster reaches the Waiting state, it's ready to accept a "step", which is synonymous with "workload" or "job".
Cluster Step
From the same page that presents the cluster status, click the Add Step button to bring up the step configuration dialog.
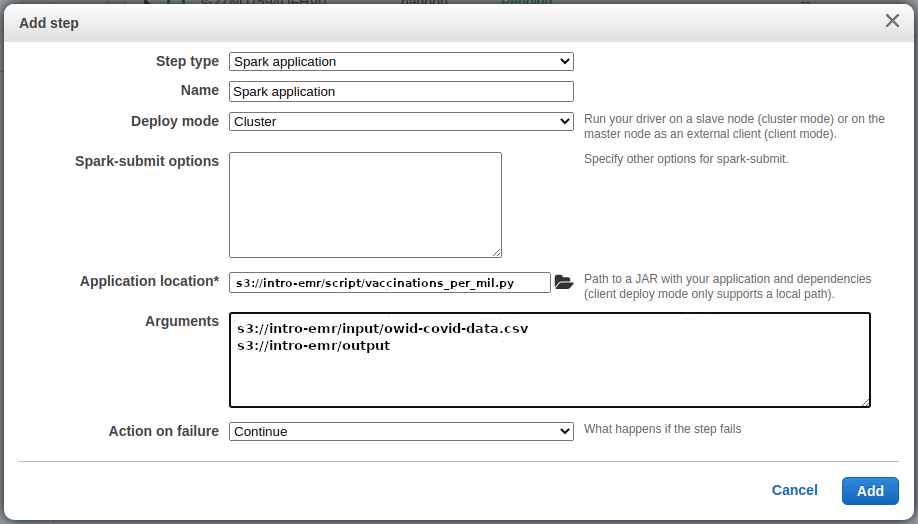
Set the Step type field to Spark application.
Set the Application location field to the path to the PySpark script that was uploaded to the S3 script/ folder. The path should look something like "S3://YOUR-EMR-S3-BUCKET/script/vaccinations_per_mil.py". You can click the folder icon to navigate to it.
Then update the Arguments field with the command line parameters for the PySpark script which should look something like:
s3://intro-emr/input/vaccinations_per_mil.py
s3://intro-emr/output
Press the Add button to finalize the operation. The dialog will close and we can observe the status of the new step.

If there were no errors in the step creation data entered in the dialog, the step status should progress from Pending, to Running, then Completed. You may need to click the refresh icon next to the filters form to update the status displayed.
On the other hand, if there was an error on the dialog, the status will indicate Failed. You can then access the output of the process and stderr using the links under the Log files column. A likely source of error could be the command line switches passed to the process in the Arguments textbox of the Add step dialog.
If there was a failure, simply follow the above steps to create a new step. The clone step features won't carry the data to the new dialog, so you might as well just create a new step and make sure the fields are all correct.
Retrieving The Results
If everything went well, we’ll be able to view the results of the job by navigating back to the output/ folder in our S3 bucket. But first, let’s terminate the cluster to minimize the runtime charges that are accruing. Just press the Terminate button at the top of the Cluster form. Once that’s done, head on back to the Management Console by clicking the AWS logo in the upper left of the window.
On the console, under Recently Viewed, click S3 to return to the Buckets form. Then click the name of the bucket you created under the Name column. The Objects form will list out the folders we created along with any additional created during the run. Click the output/ folder under the Name column, which takes us to the output data we’re interested in.

The results will be in a CSV file. There will be an additional status file named “_SUCCESS”, but we’re interested in the other one, which we can select by its checkbox, then press Download.
The file should contain something like the following:
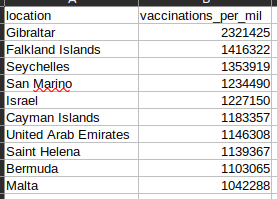
Results could vary due to the input data CSV file being more recent than the version used in the tutorial.
The number of vaccinations may appear a bit strange. For one thing, all top 10 locations are showing more than 1 million vaccinations per million, which may be accounted for considering the first and second shots being counted independently. However, Gibraltar has more than 2 million shots per million population. I leave it to the curious readers to figure why this could be so. This article was intended to give a simple survey of the EMR features with some real world data, and the analysis of the data is very simple by intent. The OWID Github repo has explanatory data on the fields of their datasets for those wanting more information, or those wishing to utilize the resources they provide.
Terminating The Cluster
If you've already terminated the cluster, you can skip this section.
Unless you intend to have node clusters running unattended, you'll want to shut down your cluster to avoid accruing runtime charges. This is fairly easy to do.
From the Management Console click the EMR service link to view your clusters. The form will list all the clusters you've created, including those previously Terminated. Select any that haven't yet been terminated, and then press the Terminate button. Then check their status to ensure they've been killed.
Summary
If you've followed the steps above, you should have gained a hands-on practical understanding of what AWS EMR is and how it facilitates setting up clusters to process whatever big data jobs you'll need to create solutions for. Any initial uncertainty should now be replaced with a sense of confidence that will help you continue on your path to EMR mastery.
Next Steps
This tutorial's focus has been very high level and didn't dive into full detail on the various services and options available. You're encouraged to go back through the pages and forms we touched on and use the Learn more links to further familiarize yourself with the available services and components and their configurable features. This should give you a good general sense of what the EMR tool set offers, which you can refer to when scoping big data solutions moving forward.
If you're interested in learning more about the basics of software development, check out our Coding Essentials Guidebook for Developers, where we cover the essential languages, concepts, and tools that you'll need to become a professional developer.
Thanks and happy coding! We hope you enjoyed this article. If you have any questions or comments, feel free to reach out to jacob@initialcommit.io.
Final Notes
Recommended product: Coding Essentials Guidebook for Developers

